Analog sticks are difficult to use with precision. In some games this isn't an issue, but in the first-person shooter (FPS) genre, it most certainly is. There are many techniques that can be used to improve the overall experience, but one in particular is creating a "dead zone".
For those who don't know, a dead zone is an area within the analog stick's range of movement where input is not registered. With some controllers, even if the stick is resting in the center untouched, it could still be registering a small amount of input. Issues like this are what create a gap between a player's intended input, and the input registered.
In this post I'm going to cover a couple of different dead zones. The first two are important because the build the foundation for the solution I settled on: the Pinwheel Dead Zone.
The segments of code shown below are written in C# and use libraries from Unity3D libraries, but the code should be easy to translate to any language. A couple of variables that repeatedly show up are:
- deadZone: Size of the dead zone area.
- axis: The XY input vector for the analog stick.
Axial Dead Zone

Fig. 1: Axial
Probably the simplest solution, this method is perfect for games that only require the analog stick to act as a 4-directional axis.
When I first implemented this into my FPS game, I immediately knew I would need something better. The resulting effect was clunky, imprecise, and difficult to control.
The below code is pretty self-explanatory. When the X or Y value is less than the dead zone value, then that value isn't registered for input.
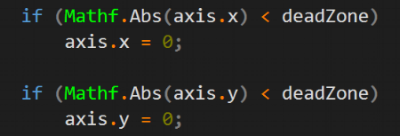
As seen in Fig. 1, the shape created is a cross extending to the outer edges of the stick's range. This works for motions going directly towards one the cardinal directions, but the issues arise when both the X and Y values are greater than the dead zone value.
Radial Dead Zone
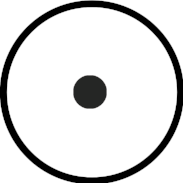
Fig. 2: Radial
This is the more intuitive solution. The line of thinking here is that analog sticks move in a circular motion. So when thinking of the shape of dead zone, it only seems natural to also make it circular.
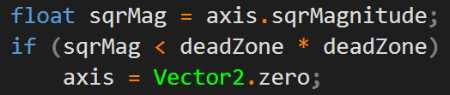
To do this, it's as simple of as checking if the input vector's magnitude is less than the dead zone value. If the magnitude is greater than the dead zone, then the given input value is just returned to the user. Also as an extra note, I used the squared magnitude instead to avoid performing an extra square root calculation.
Now the input's directional control felt smoother and precise. However, I realized that for my case there was another issue.
I have variable movement speed and look speed, and each is scaled by its respective analog stick's input . The further the left stick is pushed in a direction, then the faster the player moves in that direction. The same applies to looking around with the right stick. So if the input's magnitude is 0.1, and the dead zone value is 0.2, then the look and move speeds are 0. However, if the magnitude is 0.21, just slightly greater than the dead zone, then the speed jumps from 0 to 0.21. The effect of this jump feels jarring, sudden, and unnatural.
After doing some research, I found the solution to be what is called "linear remapping". The idea is to linearly remap the range between the dead zone and the stick's max range (Fig. 3) to be between zero and one (Fig. 4).
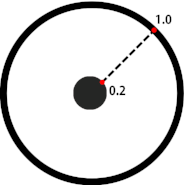
Fig. 3: Before remap
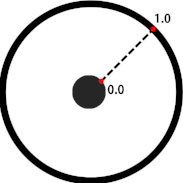
Fig. 4: After remap

In the above code I'm linearly remapping the magnitude of "axis" to be between 0 and 1, which in turn will change the X and Y values. The last line is a little inefficient since I'm square rooting "sqrMag" and also calling the "axis.normalized" getter. The code below accomplishes the same thing, and illustrates a little better the values being used in for the remap.
Click to Enlarge
Pinwheel Dead Zone

Fig. 5: Pinwheel
After a lot of testing, I was satisfied with the Radial Dead Zone for movement control. Unfortunately, using it for the first-person camera control still didn't feel good enough.
I noticed that when I tried to push the stick directly towards only one axis, it would still register a small amount input for the other axis. As I first mentioned at the beginning of this post, analog sticks are difficult to control with precision, which results in the stick's actual direction being slightly off from what the player intended. It isn't impossible of course to get the stick's direction to be perfectly on one axis, but it requires an inconvenient amount of finesse.
The solution I came up with is what I call the "Pinwheel Dead Zone". I couldn't find this solution documented on the internet, but I know that other FPS games have implemented the same or at least a similar dead zone. So for lack of a better name, I'm sticking with "Pinwheel".
It's a combination of the Radial Dead Zone and the axis-snapping effect from the Axial Dead Zone. First it does the Radial Dead Zone check, and if the input isn't dead, performs the tweaked version of the Axial Dead Zone check in the code below.

The idea behind the above code:
- Give both of the axes a separate dead zone.
- Each axis' dead zone starts at the edge of the Radial Dead Zone and reaches out to edge of the stick's max range (like the Axial Dead Zone).
- The smaller one axis' input is, the smaller the dead zone is for the other axis.
- Conversely, the larger one axis' input is, the larger the dead zone is for the other axis.
As seen in Fig. 5, the shape of each of the axis specific dead zones fan out as they go further out towards the outer edge. The red area is the X dead zone, and the blue area is the Y dead zone.
Conclusion
Dead zones are only part of the equation for getting the most out of controller input. I will be updating the site soon with more input articles about aim assist, ramping, and more. So stay tuned!